Creative Cards by Pat

Independent Stampin' Up! Demonstrator

Monday, March 2, 2015

Crisp Cantaloupe


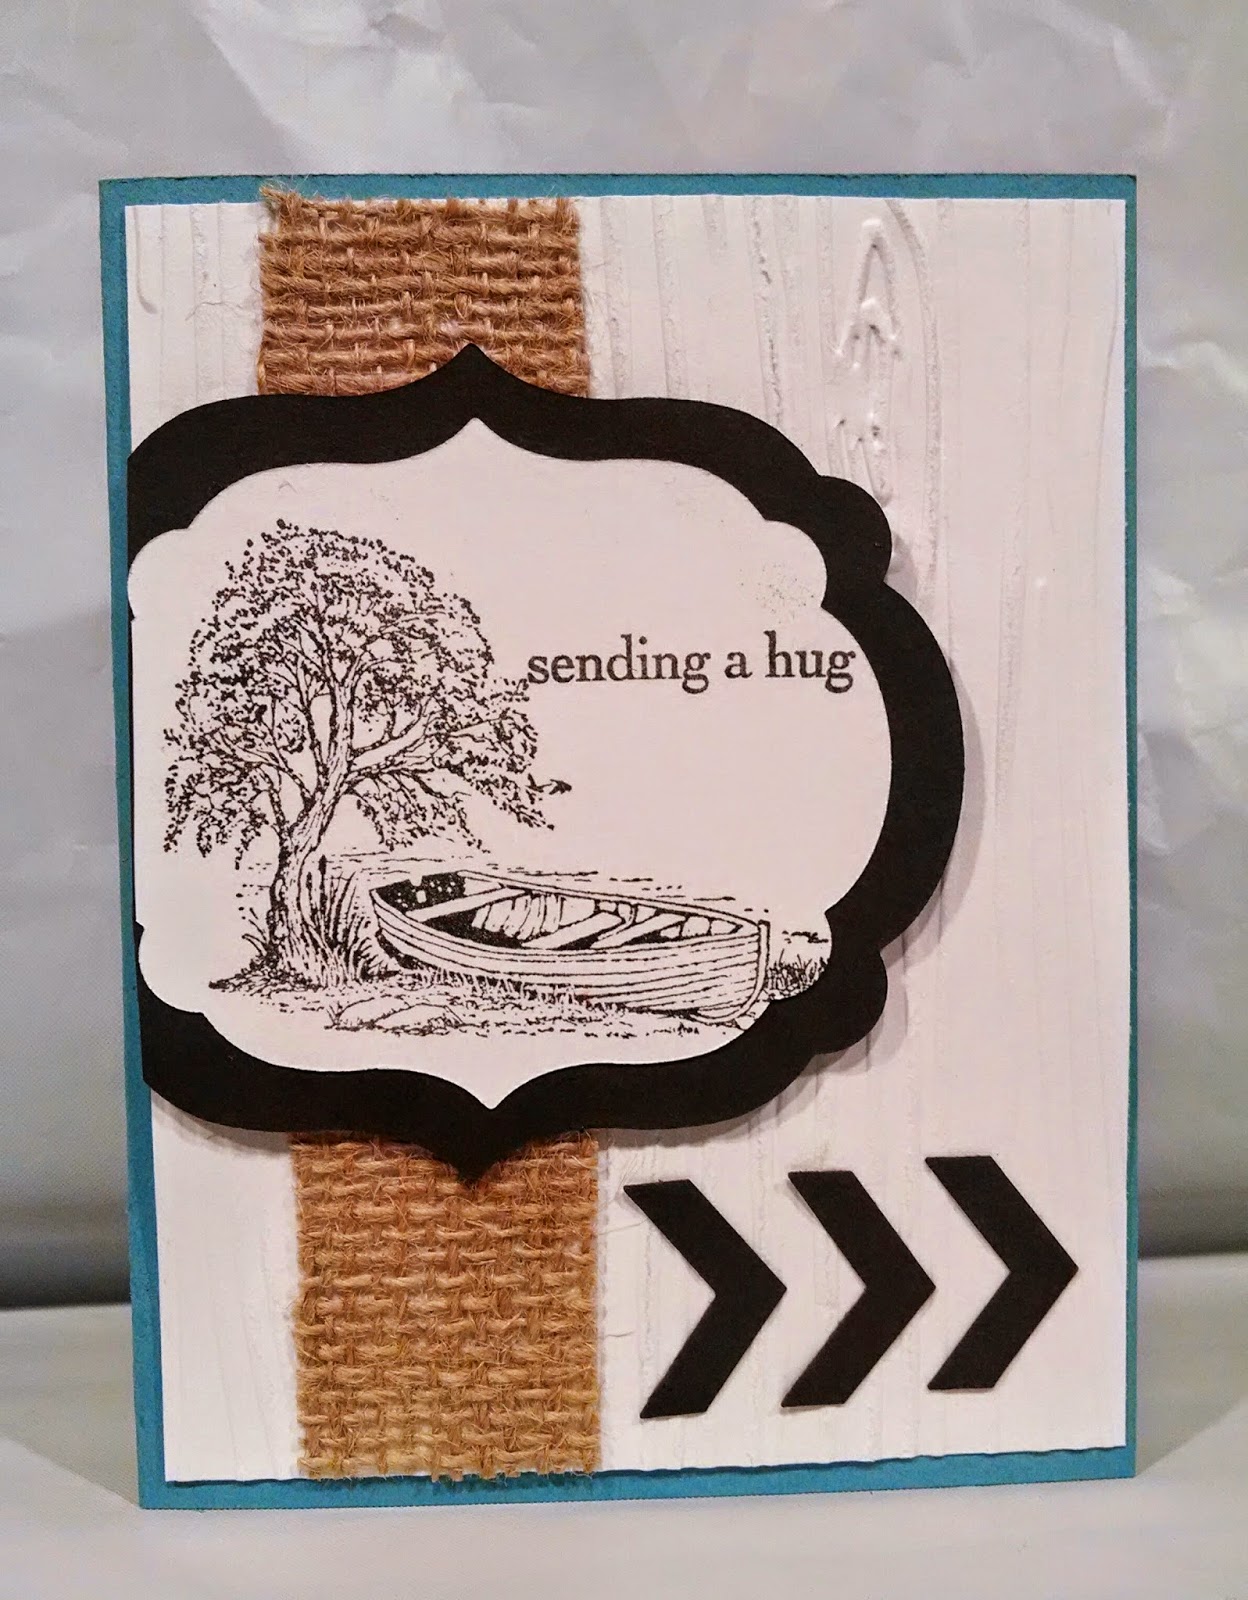
Here is a card that I made for a friend's birthday.

I tend to be a "neutral color" kinda gal.  

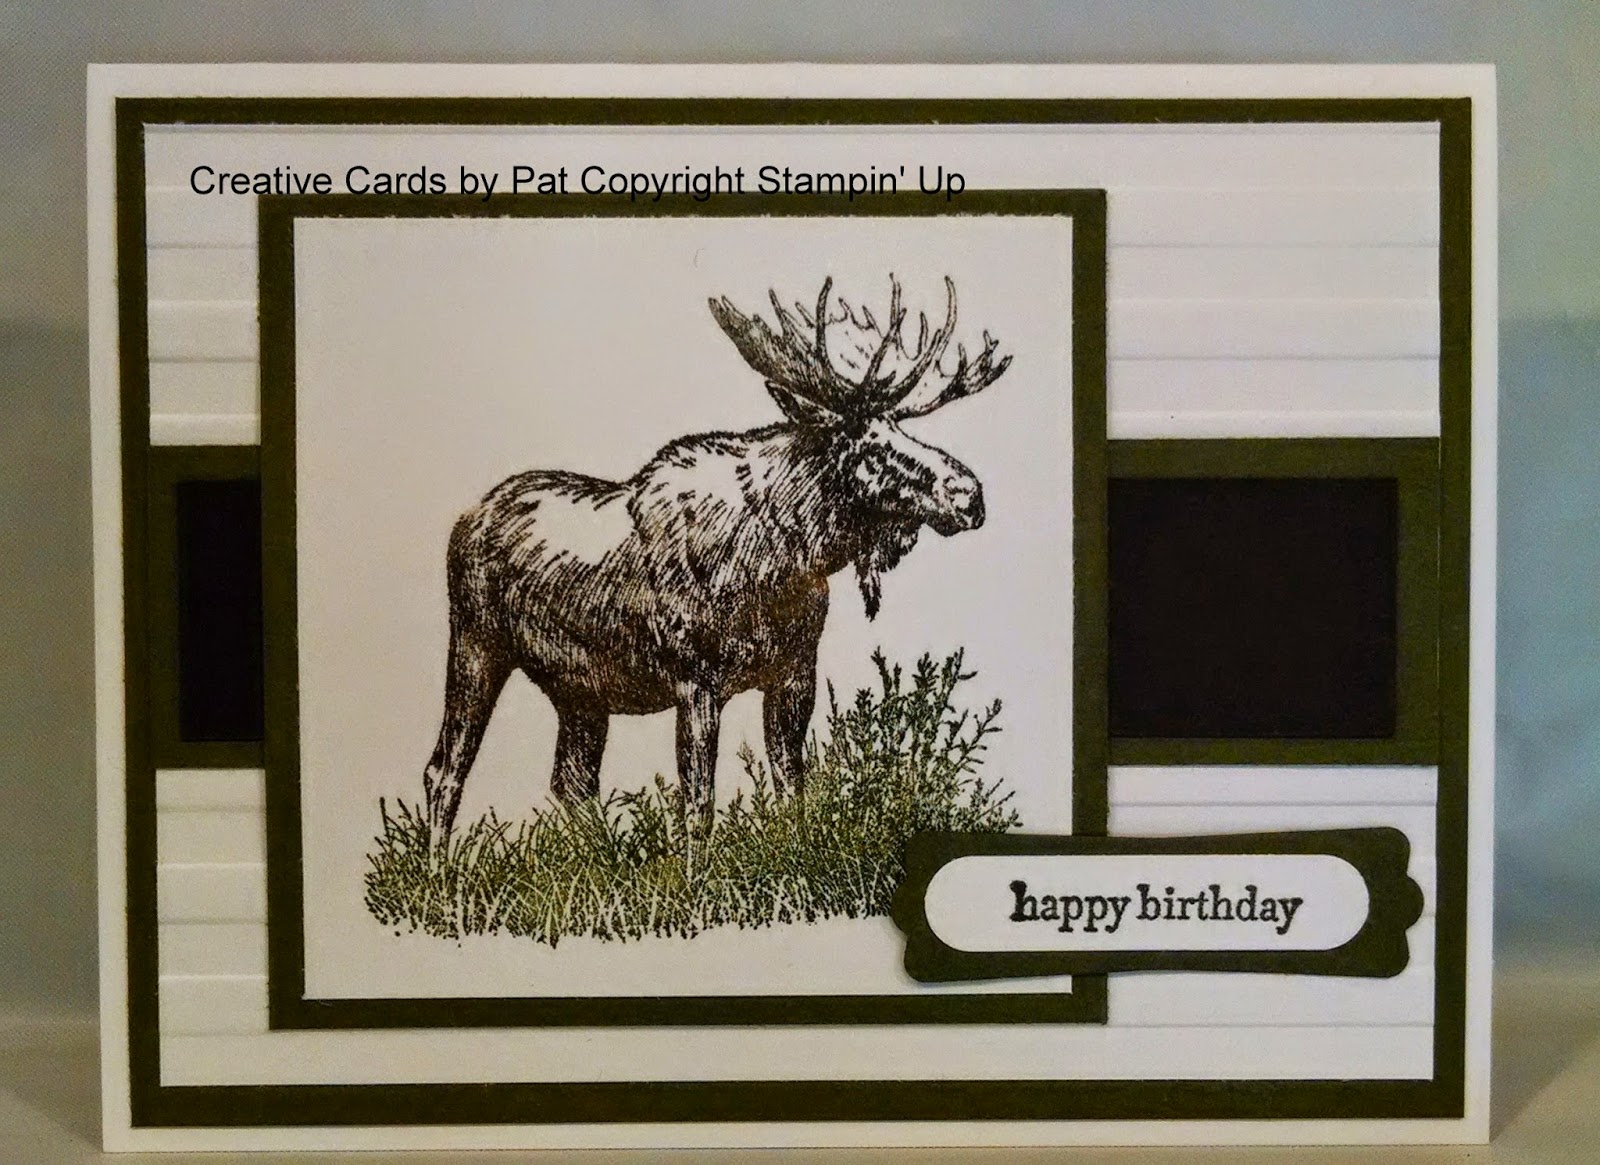
With a card base cut from cardstock the color of cardboard and speckled with Stampin' Up!'s Crisp Cantaloupe ink your choice of stamps from the Gorgeous Grunge stamp set I created an interesting background for this card.

.

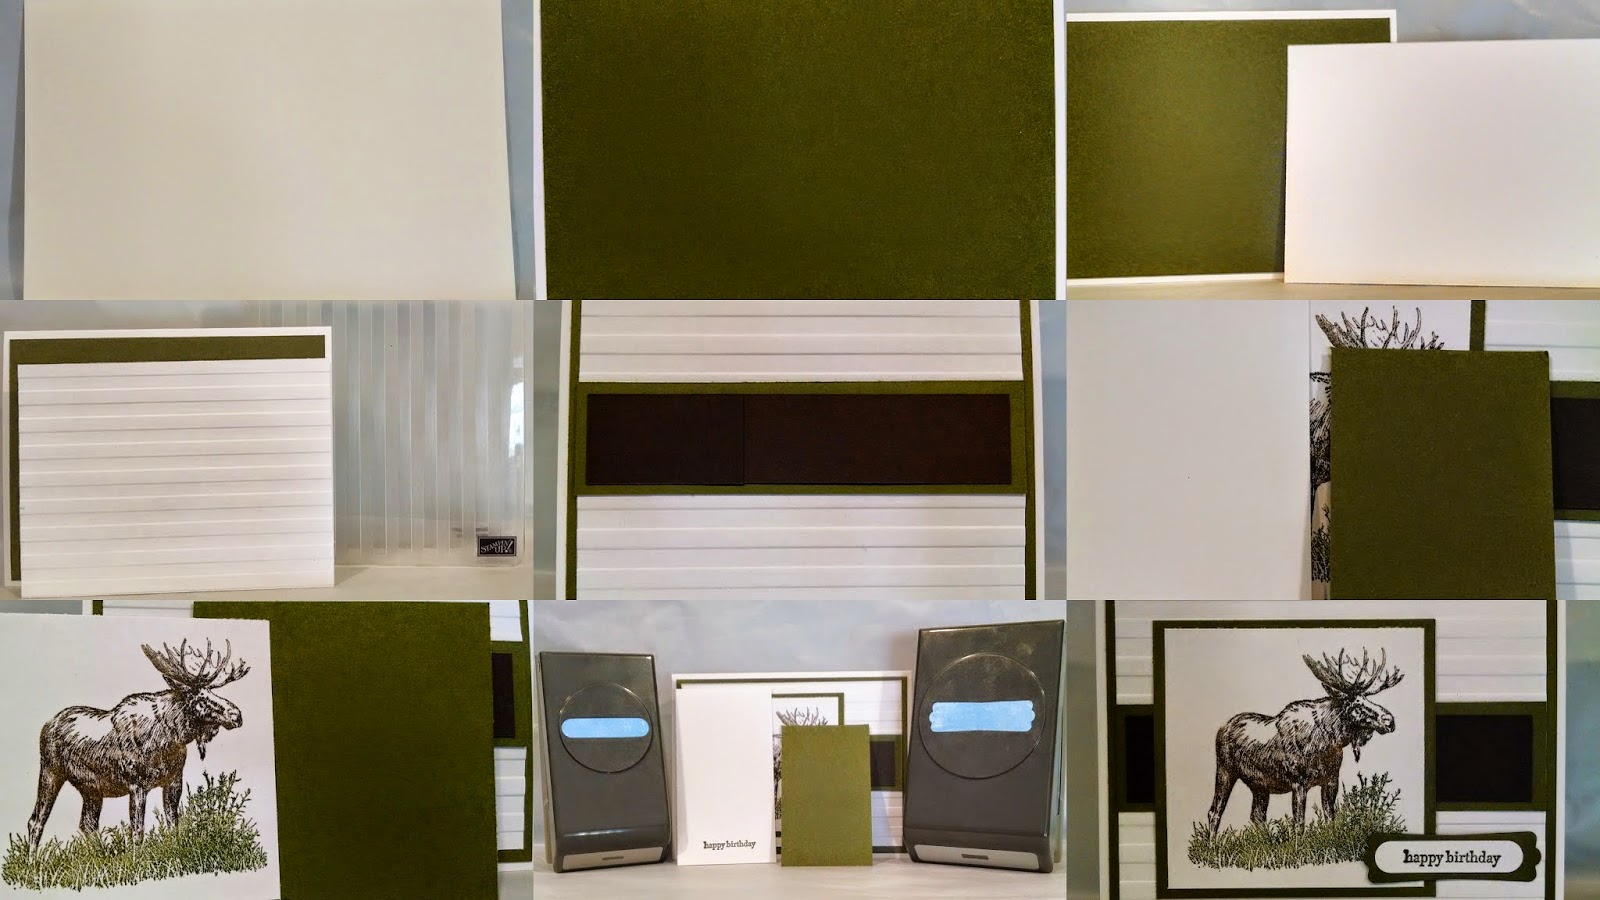
Now it's time to add some color to your patterned base!

Cut a piece of Crisp Cantaloupe card stock 5" x 2.75" and notch out the bottom as shown.  Using a the Bigshot and a textured impression folder run the this piece of cardstock through giving it texture.  I used the Beautifully Baroque textured impressions folder.  

Next, using a 1.75" scalloped circle punch...punch out a cirlce from a coordinating piece of pattern paper.  

The third layer (Whisper White) is cut to 3.5" x 2.25" and using either a flower or grass stamp and Crisp Cantaloupe ink stamp the front of the Whisper White cardstock.  I used the "grass" stamp from the Wetlands stamp set.

Choose a patterned border stamp of your choice and again using the Crisp Cantaloupe ink 
stamp an image of the border about 1/4" from the bottom of the Whisper White cardstock.

Using a scrap of Crisp Cantaloupe cardstock cut a piece 2.5" x 1" and again notch out the end.
Stamp your sentiment and Crisp Cantaloupe ink on this banner toward the right side.

Now you are ready to assemble all the pieces that will give your card dimension!

To finish the card off find a color coordinating doo-dad and some natural twine.  The doo-dad I used is made like a button so I threaded the twine through the button and tied a cute little bow.  I attached this embellishment with a Stampin' Dimensional because of how well it sticks to the embellishment.

So even though this card started off with a very neutral piece of cardstock the finished product gives me a very "springy" feel!  It's been a very long winter here and we really need a touch of spring;)

Most things you need to make this card can be purchased through my on-line store by clicking
ShopNow

Monday, February 23, 2015

Another masculine card!

Stampin' Up! has a great selection of masculine stamps.  The set I am using here is called Moon Lake.  Click here to see the entire set!  

I just love the color combo of Marina Mist and Early Espresso!  

Cut the standard A4 base from Marina Mist carstock (5.5" x 8.5") and fold half.

Layer a piece of Whisper White cardstock (5.25" x 4") after running the piece thru a Bigshot using the Wood Grain embossing folder.

I had a scrap of burlap that I thought would add some great texture to my card so I cut a piece (1" x 5.25") to create my next layer!  I love the texture it adds to the card:)

Then taking a piece of Early Espresso card stock and another piece of Whisper White I used my Bigshot and 2 framelits (one, one size smaller than the other) from the Labels Collection Framelits to cut out two different sizes of the label.  

(When I am making mulitiple cards, I layer up to three pieces of cards stock when running it through the Bigshot to eiher texture or cut out shapes.  You will find that the darker colors of cards stock seem thicker and may not cut as well when trying to cut multiples at one time.  If this happens, but back to layering only two pieces and you won't have any trouble at all!....this is just a time savings tip.  If you prefer to cut one piece at a time, go for it:)

Before adhering the Early Espresso label and the Whisper White label, I stamped my image and sentiment in Early Espresso ink.  After stamping go ahead and adhere one label to the other.  You can cut off one site of the label for another interesting aspect to your card.

The burlap I used  made it a little bulky to apply the label so I used the Stampin' Dimensionals to raise the label up off the face of the card allowing room for the burlap.

When I had this done, I thought the card still needed something...hmmmm....I remembered the Chevron's I had punched out and thrown away when making another card!!!  I scooped them out of my paper scraps and added them to this card to give it a more complete look:)  


As always everything you need to make this card can be purchased through my online shop!


Sunday, February 22, 2015

Think Spring!

Brrrr....the temp outside is a chilly 8 degrees!!!   Oh I know it can be colder than that, but I'm ready for spring!
Here is a card that makes me think spring when I look at it:)


You could easily copy this card with minor changes and create a totally different look.

Grab a piece of your favorite pattern paper and some coordinating colors of card stock.


My card base is made of Whisper White cut to 8.5" x 5.5" (fold this in half)

The next layer is a piece of the patterned paper cut to 5.25" x 2.25"
Cut a piece of the coordinating cardstock (I used Hello Honey from the new "In colors")to the same size 5.25" x 2.25"...I wanted to give the plain cardstock some character so I used the "spotted" stamp from my Gorgeous Grunge stamp step to stamp speckles on it.  This is where I stamped my sentiment too.  You can use any sentiment.

Adhere the two pieces to the front of your card base...they will overlap in the middle

Next I took another color of the coordinating card stock, "Pistachio Pudding" and cut it 5.25" x 1.25".  For this piece I used one of my border punches and punch a design  along one edge.  Adhere this piece to the card to cover up where the last two pieces overlap

 I cut a piece of the cardstock from the Pistachio Pudding stock into a 2" x 2" square and also cut a 1.75" x 1.75" square from the Whisper White.

Stamp an image on the Whisper White square and adhere it to the colored square and when ready apply both to the card.  

Easy peasy!

There is no limit to how many different cards you can make using this same patter, but with different color coordinations!

This is one of the cards I include in my cards kits for February!  Get yours now!  


Monday, February 16, 2015

Hello!

I've had another busy day putting together virtual card kits:)

I have a few ladies who cannot make class and prefer to put together cards in the comfort of their own home.  I aim to please, so I mail out kits for them to put together at their leisure!

Here is one of the cards we are making today:


Lotus Blossom!  I just love this new stamp from Stampin' Up!

This is a three-step stamp that does all the shading work for you:)  It doesn't get much easier than using this stamp step!

The card is a standard A4.  The base is cut out of Pistachio Pudding (5.5" x 8.5" folded in half).

My second is Whisper White cardstock (5.25" x 4.25").  I ran this piece through my Bigshot using the Large Polka Dot embossing folder.

I cut another piece of Whisper White to stamp on (1.75" x 4.25")  and layer that with another piece of Pistachio Pudding (2" x 4.5").  Before using my snail adhesive to attached the stamped image I cut a piece of Pistachio Pudding ruffled ribbon and adhered it to the left side of the image.

The sentiment for this card comes from A Dozen Thoughts stamp set stamp on a scrap of Whisper White and punched out with the Scallop Oval punch.  I mounted the sentiment onto a piece of Pistachio Pudding punched out with the Modern Label punch.

All the supplies needed to make this card can be purchased through my on-line store!  ShopNow!


Saturday, February 7, 2015

Welcome to my blog!  I was invited to participate in this blog hop by Cindy Ehlers who hosts her own blog; cindysstampingstudio.blogspot.com.  Visit Cindy's blog for some great ideas!

What's more fun than a blog hop to see what everyone is doing and picking up tips to be more creative yourself?

Being invited to this blog hop has inspired me:)

The most recent projects of mine are birthday cards.  I have a local business that has asked me to create birthday cards that they will give to their employees on their birthdays.  What a great gesture!

Ninety-nine percent of the employees who work for this company are male. Luckily when I placed my last order I bought a number of masculine stamps sets.  One of them I used was "Walk in the Wild".  The moose stamp has wonderful shading giving the stamped image so much depth.  I love it!

Sequential pictures for assembly of my first card.

Cut a piece of Whisper White cardstock to 5.5" x 8.5"

Fold the Whisper White cardstock in half to form the base for your card.

Cut a piece of Mossy Meadow cardstock to 5.25" x 4" and apply to the face of your card with Stampin' Up's snail adhesive.

Next I took a 5" x 3.75" Whisper White cardstock and ran it through my Bigshot with the a Textured Impression embossing folder of your choice.  I used a folder with bold stripes...trying to keep it manly:)  Apply the textured Whisper White carsdtock as the next layer on your card.

To help add interest to the card I cut a piece of Mossy Meadow cardstock to 5" x 1.25" and again using the snail adhesive applied it to the card slightly above center.   

Because I wanted to stamp the Moose in Early Espresso ink I added a piece of Early Espresso on top of the Mossy Meadow...but this piece 4.75" x 1" and apply.  (Shhhhhh....I love to find ways to save on cardstock ...you can see where I pieced together to 1" strips of the Early Expresso...the seam will be covered by my Moose stamp...NO ONE WILL EVER KNOW:))

The Moose stamp is quite a large stamp!  To make it fit nicely I cut a piece of Whisper White cardstock 3" x  3" and also cut  piece of Mossy Meadow 3.25" x 3.25" to layer behind it.  BUT before adhereing these two piece together I need to stamp my image.   (ALWAYS STAMP BEFORE MOUNTING PIECES TO A PROJECT).  When you want multiple colors on one image, use your Stampin' Write Markers to color each section.  I don't have the Mossy Meadow Stampin' Write Marker so I used a Sponge Dauber  and my Mossy Meadow Classic Stampin' Pad to color the grass on this stamp.  When done stamping, adhere the two pieces of cardstock together and mount on the front of the card.

Lastly I need a sentiment for the card.  This card could be used for many occasions.  Many times I will make cards and wait with adding the senitment until an occasion comes up when I need a card.  At that time, you add the sentiment you need!  For this card I used the "Happy Birthday" stamp from the Teeny Tiny Wishes stamp set and the Mossy Meadow Classic Stampin' Pad.  After stamping the sentiment I punched it out with the Word Window punch and punched a Modern Label punch from the Mossy Meadow cardstock.  Adhere the sentiment to the punched Modern Label and adhere both to your card!

Whew!  That seems like a lot of work, but it really isn't.

The finished product!


I was asked to answer 4 questions as a participant of the blog hop.  Here goes:)

1.  What am I working on?  I answered this question at the beginning of my post...I'm working on an order of 20 birthday cards for a local company.  

2.  How does my work differ from others in my genre?  Well I will be ther first one to admit that I like a certain look to my cards.  After reading another demonstrators answer to this question I will use her words....I like my work to be "clean and crisp".  I'm don't do well with the vintage or aged look some people use when making cards.  I really like that look, but have a hard time achieving it to my satisfaction.

3.  Why do I create what I do?  I sell most of the cards I make.  Because my cards won't sell if I don't have some for all different tastes I try to mix it up.  

4.  How does my creativity process work?  I actually have been thinking I need to change the process I have fallen into when getting ready to create a card.   I typically start by sitting down with my computer and searching Pinterest for ideas.  I GET SO LOST IN LOOKING AT EVERYONE ELSE'S CREATIONS THAT I DON'T GET STARTED ON MY CARDS:-(   It has been my thought that I just need to sit down at my desk with a couple color card stock an get down to it!  I will have to get back to you and let you know how that works:)

I hope you have enjoyed visiting my blog!  


Friday, March 14, 2014

I was cruising around on Pinterest and found this beautiful card. I found the card on Patti Lee's site...
Great Job Patti!!

I copied the post right from Patti's site:

This pocket card is a past favorite card style - bring it back!!!! NOW fill it with flowers. I love how this turned out. Simple layering of the flower shapes makes this easy to make. Leave the flowers flat or they can be shaped with a bone folder. Flip up the pocket for an additional area to leave a message. Card size is 5-1/2" x 4-1/4".

With note card removed: message to be stamped later. 

Card front template:

Note Card measurements: 

Cut pieces: 

(1) 5-1/2" x 8-1/4" Rose Red CS, score as shown in above template
(1) 4" x 5-1/4" Rose Red DSP
(3) sets of flowers in Whisper White CS
(1) 3-3/4" x 3-3/4" note card in Whisper White CS (not shown in photo)
(5) leaves in a mixture of sizes for variety (not shown in photo)
(3) 3/3" Punched circles in Rose Red CS for flower centers. (not shown in photo)
Using a sponge dauber and Rose Red ink, ink the centers of each flower. 

Assembly: follow the green arrows

Use the wide oval punch as well as the large oval punch for punch out the leaves. Fold them in half, then put them through the crimper.

Here are the finished flowers and leaves:

Using the Big Shot, position the 4-1/2" x 5-1/4" paper into the Vintage Wallpaper in the folder for this great impression


Attach the Rose Red DSP 1/8" away from the edge, then fold the Rose Red DSP back (underneath). You may not wish to attach the DSP while the paper is flat. The fold lines will cause the paper to "buckle". Insert the white note card. Using the back of the card, cut off the excess. Your card should now look like this: 

Supplies: 
Stamps: none 
CS: Rose Red, Whisper White, Old Olive, Rose Red DSP (retired) 
Ink: Rose Red 
Accys: SU Exclusive Vintage Wallpaper Impression Folder, SU Exclusive Big Shot Blossom Party Die, Large Oval Punch, Wide Oval Punch, Itty Bitty Shapes Punch Pack, Sponging Daubers, Dimensionals, Crimper.

Monday, March 3, 2014

Relay for Life

Hello Everyone!

I have been inspired by my neice who has participated in fundraising for Relay for Life for the last 4 years.  Each year she walks in memory of my mother who passed away at age 45 of colon cancer.  My mother-in-law and neice are also both cancer survivors.  Even after three family members have been touched by the disease we feel greatful and blessed that we are healthy and happy family.

In the spirit of giving and in supporting such a great cause I will be selling greeting cards for $3 each and donating $1 each to Relay for Life.  I am making this a virtual fundraising event in the hope that I will reach more people.  The following six cards have been tagged with an identifying numbers and are the cards I will be making and selling.  

So friends near and far please contact me by either sending me a message on Facebook at Creative Cards by Pat or email me at pschultz1@frontier.com if interested in the cards and in donating to worthy cause.  

Every order counts toward finding the a cure for cancer.  I appreciate your support.


                                    #1                                                     #2              


                                                  #3                                                    #4                            

 #5                                                               #6